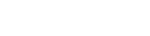
Totris Game in Godot
I have previously created a game like this in Godot and published the code here: Tetron
But I will create a new game from scratch here to try out some new ideas.
First we will create a Class for a Shape.
Shape Class
This will hold information about the arrangement of Tiles for a shape, the Color, and have some methods such as for rotation.
The simplest possible way to represent the shape is probably using a 2D Array of Noughts and Crosses. But we need to be able to enter this as an exported var in the Inspector. We could use a Multi-line string and call it cells.
export(String, MULTILINE) var cells
In the _ready function, we may parse this text data and convert it into an Array of boolean values (true/false) to represent the shape.
Since the name Shape is used in the engine for collision Shapes, we will prefix our class name with T.
Here is some code for our Class and to Parse the text.
extends Node2D

class_name TShape

export(String, MULTILINE) var cells
export var color: Color
export var weight = 1.0
export(Texture) var tile_texture

var tile_map: Array
var tsize: int
var step_size
var edge_pos
var coordinate_matrices = [[-1,1], [-1,0,1],[-2,-1,1,2]]
var tile

func _ready():
	# Parse cells data
	var lines = cells.split("\n")
	for line in lines:
		var row = []
		for ch in line:
			row.append(ch == "x")
		tile_map.append(row)
	tsize = int(max(tile_map.size(), tile_map[0].size()))
	print(tsize)

	# Create Tile
	tile = Sprite.new()
	tile.texture = tile_texture
	tile.modulate = color

	# Evaluate useful vars
	step_size = tile_texture.get_size().x
	edge_pos = step_size * tsize / 2.0

	# Add the tiles as child nodes
	set_tile_positions(true)
We create a 2D array tile_map as a property of our TShape class to store the shape.
To do this, we split the text into lines based on newline deliminator characters ("\n"). Then we scan each line appending true or false (depending on if the character is an x or not) to the row array. Then add the row to the tile_map array.
Newline deliminator characters vary between platforms, but Godot standardized on the newline char rather than including carriage return as was used with mechanical typewriters in the past where the operator pulled on a lever to move the paper up by one line after the print head had gone back to the left margin stop to start a new line of text
I added some print statements to allow for checking that it works as intended.
The tsize is obtained from the max value of width or height of the arrays. This will be useful when we want to rotate the shape about its center point. The max function produces a float value which we convert to an integer using a process known as type casting. In fact the size() values are cast to floats when they are passed into the max function.
Also, I added export vars for the Color of the tiles and a weight factor to be used when choosing the next shape to use in the game.
To add tiles and set their positions we create a new function:
func set_tile_positions(add_tiles = false):
	var pos = Vector2.ZERO
	var idx = 0
	for row in tile_map:
		for cell in row:
			if cell:
				if add_tiles:
					tile.position = pos
					add_child(tile.duplicate())
				else:
					get_child(idx).position = pos
					idx += 1
			pos.x += step_size
		pos.x = 0
		pos.y += step_size
We call this from the _ready function where it adds child node tiles to the parent node. Later, we will call this function after rotating the tile_map in order to reposition the tiles.
We Play this scene by itself to test it.
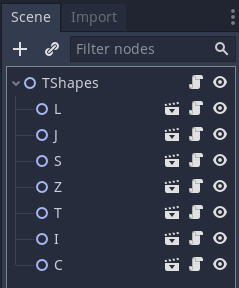
Now we may instantiate this scene multiple times in another scene that stores all the Shapes that we need for the game.
Shape Factory
This scene will be used to store and provide Shapes from a generate function.
We will instantiate TShape nodes and define the shapes, colors, and weights for all of them. Then add a script to generate a shape on demand based on a random value and the weights.
In the _ready function we will add up the individual weight values and store this as mass, and for clarity in the code we will store node references to an array.
In the generate function we get a random pick value between zero and mass, then find which shapes weighted average value sums up closest to our pick. Then return the data for this shape.
Here is the code:
extends Node2D

var tshapes = []
var mass = 0.0

func _ready():
	for node in get_children():
		# Cast the node variant type to a type of TShape
		var tshape: TShape = node
		# Add up the weights
		mass += tshape.weight
		tshapes.append(tshape)

func generate():
	var pick = randf() * mass
	for t in tshapes:
		var tshape: TShape = t
		pick -= tshape.weight
		if pick <= 0.0:
			return tshape
	assert(false) # Should never reach this point
When looping over arrays, the value is a variant, but it is nice to have auto-complete for the actual type, hence the typecast to TShape that we use.
I added an assert statement here which is useful to halt program execution if the conditions of the assert evaluate to false in the development environment as an aid to debugging.
Main Scene
This scene will be constructed like a User Interface, so we will use Control Nodes. We need buttons for control, labels for the Score, and a Grid to contain the Tiles of the Shapes in the play area.
Control
We will implement a simple state machine to control the flow of the game in response to user input and events.
Game Mechanics
We will need a fair bit of code to rotate and shift shapes and to test for valid moves.
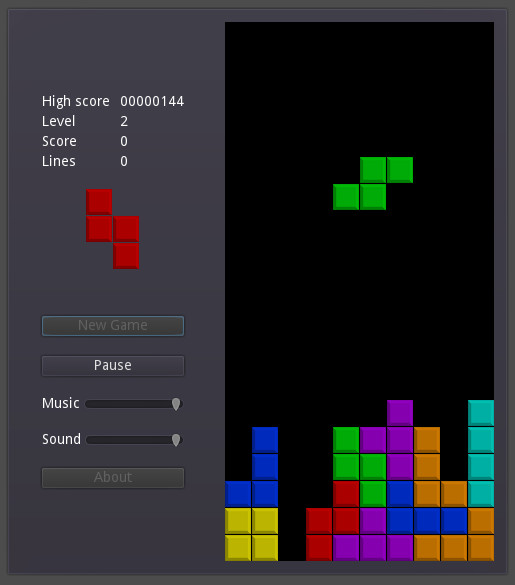
Local grid coordinates
These diagrams show how we may define local coordinates for a shape and the pivot point for rotation.
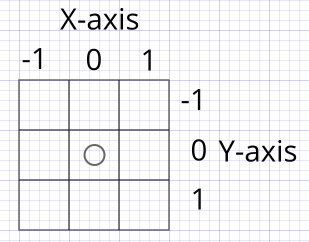
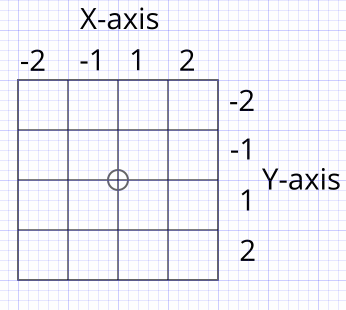
We can encode these positions in a 2D matrix.
var coordinate_matrices = [[-1,1], [-1,0,1],[-2,-1,1,2]]
Shape rotation
Using matrix math and 90 degree moves, we can come up with some simple formulas for rotation transformations.
Clockwise rotation: x = -y, y = x
Anti-clockwise rotation: x = y, y = -x
Homework
To fully understand the above I recommend sketching out some shapes in a grid on paper and manually applying the rotation transforms to see how they work.
Rotation code
This rotates the tile_map values left or right. We will map the index values of the tile_map to our coordinates specified in the above diagrams. Then apply the rotation, and map the new coordinate value back to a tile_map coordinate.
func rotate(left = true):
	var rm = coordinate_matrices[tsize - 2]
	var rotated_tiles = tile_map.duplicate(true)
	if left:
		for y in tsize:
			var xx = rm.find(-rm[y])
			for x in tsize:
				rotated_tiles[y][x] = tile_map[x][xx]
	else:
		for x in tsize:
			var yy = rm.find(-rm[x])
			for y in tsize:
				rotated_tiles[y][x] = tile_map[yy][y]
	tile_map = rotated_tiles
	set_tile_positions(false)
We first pick one of the coordinate sets based on the size of the tile_map.
Then we select one of two loops depending on which way we want to rotate. Then we transform the positions of the boolean values that are stored in the arrays of the tile_map to rotated_tiles, then update tile_map with this.
Finally, we set the tiles to the new positions.
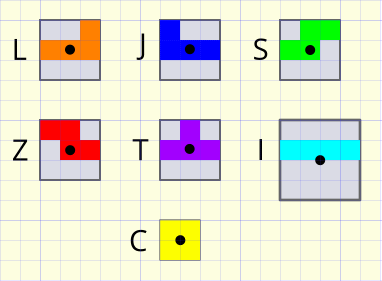
Testing
At this stage it’s a good idea to test the TShapes scene to see if the shapes are well-formed and may be rotated correctly.
We can detect that the scene is being run on its own and call our test script from the _ready function.
	if get_parent().name == "root":
		test()
Then add a test function.
func test():
	var pos = Vector2(80, 20)
	for t in get_children():
		t.rotate(false)
		t.position = pos
		pos.y += t.tsize * t.step_size + 5
Rotated shapes:

The tile maps are aligned to their top-left corners.
Controls
Now we have our shapes, it’s time to develop some controls. We could assign keys as follows:
- Z - Rotate left by 90 degrees
- X - Rotate right by 90 degrees
- C - Hold piece
- Space - Start/continue playing -> Hard drop
- Left arrow - Move left one step -> move continuously
- Right arrow - Move right one step -> move continuously
- Down arrow - Soft drop
- ESC - Pause -> Reset -> Quit
In code, we will detect the key-presses to generate events that we feed into a state machine to give us precise control over the game. We will also need timers.
There are many variations of how Tetris operates, so we may want to implement a Options screen and the options will affect how the game states get traversed.
Here is a great guide to it all: Tetris Strategy Wiki
To start with, I will implement a simple control system.
Key press detection
Keys are pressed and released to generate events that may be captured in the _unhandled_input function. Timers may be started that generate a timeout event for when a key is being held down. The timer may be stopped if the key is released.
The key press events contain a key code that we may use for our event ID code. And the pressed state of the event indicates if the key was pressed or released.
When a new event occurs, we will input this event ID into our state machine handler function. It will then look for the current state and process code for this event within that state.
So we should define all the states with ENUM values.
# STATES
enum { READY, PAUSED, PLAYING }
Some simple code to capture the events and call the state handler function:
func _unhandled_input(event):
	if event is InputEventKey:
		handle_state(event.scancode, event.pressed)
We can define extra events such as for timeouts:
# EVENTS
enum { TIMED_OUT }
Structure of the state machine:
var state = READY

func handle_state(code, pressed):
	match state:
		READY:
			if code == KEY_SPACE and pressed:
				start_game()
				state = PLAYING
		PAUSED:
			if code == KEY_SPACE and pressed:
				resume_game()
				state = PLAYING
		PLAYING:
			match code:
				KEY_LEFT:
					if pressed:
						start_moving_left()
					else:
						stop_moving_left()
				KEY_RIGHT:
					if pressed:
						start_moving_right()
					else:
						stop_moving_right()
				KEY_Z:
					pass
				KEY_X:
					pass
				KEY_C:
					pass
				KEY_SPACE:
					pass
				KEY_DOWN:
					pass
				KEY_ESCAPE:
					pass
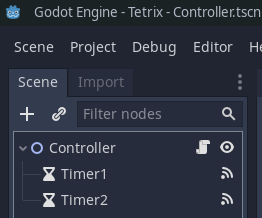
We may encapsulate the state machine, input event code, and timers into a Controller class by creating a new scene and script for it.
Then extend this class for our main scene. The main scene will then be free of a lot of clutter and, we may test and work on our controller in isolation.
We add a Timer to the scene and connect its timeout signal to the script. Then we may call the handle_state function with the custom ENUM value for the timer event. In the state machine, we may start the timer with any timeout period and stop it if need be. In fact, we will need 2 timers (one for horizontal moves with a key down, and one for Soft drop for example). But they are general purpose.
func _on_Timer_timeout():
	handle_state(TIMED_OUT, false)
Key repeats
One problem with the above approach is that the keyboard emits the key code as if you were typing a document i.e. they repeat if you hold the key down. This can be overcome by using the event.is_action_pressed method, but this needs the action name as a parameter.
So let’s adapt our _unhandled_input function to only pass on changes of key state to the state handler.
We may use a dictionary to capture and compare the states of keys that get pressed.
var keys = {}

func _unhandled_input(event):
	if event is InputEventKey:
		# Add new key to dictionary
		if not keys.has(event.scancode):
			keys[event.scancode] = false
		# Respond to change in key state (pressed or released)
		if event.pressed != keys[event.scancode]:
			keys[event.scancode] = event.pressed
			handle_state(event.scancode, event.pressed)
Testing
We will add 2 Timers and control these from the state handler function, and add all the functions that we need with simple print statements in their body. This allows for testing of the controller scene by running it standalone.
Later we will override the functions with the game logic.
Controller.gd
extends Node2D

class_name Controller

# EVENTS
enum { TIMEOUT_1, TIMEOUT_2 }

# STATES
enum { READY, PAUSED, PLAYING, DEFAULT, LEFT, RIGHT, FAST }

export var side_move_delay = 1.0
export var side_move_period = 0.2
export var soft_drop_period = 0.2
export var tick_period = 1.0

var game_state = READY
var side_moving_state = DEFAULT
var down_moving_speed = DEFAULT

func handle_state(event_code, pressed):
	match game_state:
		READY:
			if event_code == KEY_SPACE and pressed:
				$Timer1.start(tick_period)
				start_game()
				game_state = PLAYING
			if event_code == KEY_ESCAPE and pressed:
				quit_game()
		PAUSED:
			if event_code == KEY_SPACE and pressed:
				$Timer1.start(tick_period)
				resume_game()
				game_state = PLAYING
			if event_code == KEY_ESCAPE and pressed:
				reset_game()
				game_state = READY
		PLAYING:
			match event_code:
				KEY_LEFT:
					if pressed:
						$Timer2.start(side_move_delay)
						side_moving_state = LEFT
						start_moving_left()
					else:
						stop_moving_left()
						side_moving_state = DEFAULT
				KEY_RIGHT:
					if pressed:
						$Timer2.start(side_move_delay)
						side_moving_state = RIGHT
						start_moving_right()
					else:
						stop_moving_right()
						side_moving_state = DEFAULT
				KEY_Z:
					try_rotate_left()
				KEY_X:
					try_rotate_right()
				KEY_C:
					hold_piece()
				KEY_SPACE:
					if pressed:
						hard_drop()
				KEY_DOWN:
					if pressed:
						$Timer1.start(soft_drop_period)
						down_moving_speed = FAST
					else:
						down_moving_speed = DEFAULT
				KEY_ESCAPE:
					$Timer1.stop()
					game_state = PAUSED
					pause_game()
				TIMEOUT_1:
					if down_moving_speed == FAST:
						$Timer1.start(soft_drop_period)
					else:
						$Timer1.start(tick_period)
					move_down()
				TIMEOUT_2:
					match side_moving_state:
						LEFT:
							$Timer2.start(side_move_period)
							fast_move_left()
						RIGHT:
							$Timer2.start(side_move_period)
							fast_move_right()

var keys = {}

func _unhandled_input(event):
	if event is InputEventKey:
		# Add new key to dictionary
		if not keys.has(event.scancode):
			keys[event.scancode] = false
		# Respond to change in key state (pressed or released)
		if event.pressed != keys[event.scancode]:
			keys[event.scancode] = event.pressed
			handle_state(event.scancode, event.pressed)

func start_game():
	print("start_game")

func resume_game():
	print("resume_game")

func reset_game():
	print("reset_game")

func start_moving_left():
	print("start_moving_left")

func stop_moving_left():
	print("stop_moving_left")

func fast_move_left():
	print("fast_move_left")

func fast_move_right():
	print("fast_move_right")

func start_moving_right():
	print("start_moving_right")

func stop_moving_right():
	print("stop_moving_right")

func move_down():
	print("move_down")

func try_rotate_left():
	print("try_rotate_left")

func try_rotate_right():
	print("try_rotate_right")

func hold_piece():
	print("hold_piece")

func hard_drop():
	print("hard_drop")

func pause_game():
	print("Paused")

func quit_game():
	print("quit_game")

func _on_Timer1_timeout():
	handle_state(TIMEOUT_1, false)

func _on_Timer2_timeout():
	handle_state(TIMEOUT_2, false)
The timer timeout signals were connected to this script at the end and call the handle_state function with their ENUM values for their event IDs which hopefully don’t clash with any of the key ID’s. Hence, the need to test.
This is a cool way to test your game control code before creating the actual game visuals and logic. You run the scene, press the keys, and observe the Output window of the Editor.
The test functions should be left in place since they will be unused when running the main game, but still allow for later testing of the control scene in isolation.
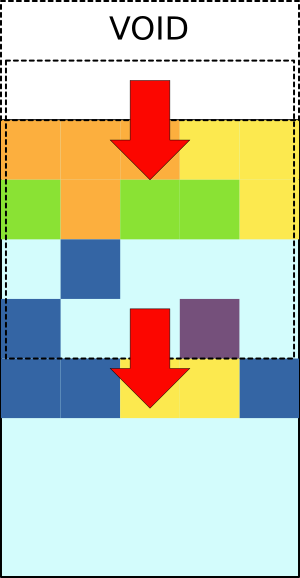
The Grid
The shapes fall and get positioned within a Grid so as this is a major aspect of the game, it makes sense to develop this as a separate Testable scene.
We may think about it as a logical grid and a visual grid. The logical grid will be an array representing whether a grid cell is occupied by a shape tile using boolean values of true or false.
The visual grid will be the sprites positioned accordingly and taking up some area in 2D.
We may keep track of the grids using arrays, these will contain null values where there is an empty grid cell and a reference to a static visual tile or a true value in the logical grid.
Let’s extend a Node2D, define a grid size, and create a function to initialize the grid arrays by clearing them.
extends Node2D

var size = Vector2(10, 20)

var grid: Array
var nodes: Array

func _ready():
	clear()

func clear():
	grid = []
	nodes = nodes
	grid.resize(size.x * size.y)
	nodes.resize(size.x * size.y)
Resizing an array fills it with null values.
Our arrays are 1-dimensional, so it is easy to clear them and the index is calculated with x + size.x * y
When moving a shape it is not part of the grid, the grid represents tiles that have been locked into place in the grid. We use it for checking for completed rows and to see if moves of the shape are possible.
For out first function, let’s create a list of rows that are complete.
We need to loop through the logical grid to find rows of true values representing tiles. If we find a false or null value in a row, we may skip to the next row.
func get_full_rows():
	var rows = []
	var idx = 0
	for row in size.y:
		var full = true
		for x in size.x:
			if grid[idx] != true:
				idx += size.x - x
				full = false
				break
			else:
				idx += 1
		if full:
			rows.append(row)
	return rows
Here, we only check for true values and make use of a break statement to break out of the x loop. The function returns an array of row indexes of the completed rows of tiles.
To remove rows from the grid we will move all rows above a block of completed rows down to cover over the block of completed rows. Also, we should move imaginary blank rows to the top of the grid equal to the number of removed rows. Then repeat, working our way down the list of completed rows. We should move both logical grid cells and those of the tile node references, and change tile node y positions to shift them downwards.
Here is a function to move to a block of n rows:
func move_rows(to, n):
	var idx
	# Scan the rows to be moved to from `to` to 0
	for row in range(to, -1, -1):
		for x in size.x:
			var v = false
			var tile: Sprite = null
			if row - n >= 0:
				idx = (row - n) * size.x + x
				v = grid[idx]
				tile = tiles[idx]
			idx = row * size.x + x
			grid[idx] = v
			if to - row < n:
				tiles[idx].queue_free() # Delete tile to be removed
			tiles[idx] = tile
			if tile != null:
				tile.position.y += step_size * n
The step_size variable is set in any function that has access to a TShape which has its step_size property set to the size of a Sprite Tile.
We will call this function from a function that derives the contiguous blocks of rows to be removed from the list of all rows to be removed.
func remove_rows(rows: Array):
	# Get lowest row
	# Move rows above to here
	var num_rows_in_block = 0
	var row1 = rows.pop_front()
	while row1 != null:
		num_rows_in_block += 1
		var row2 = rows.pop_front()
		if row2 == null or row2 > row1 + 1:
			move_rows(row1, num_rows_in_block)
			num_rows_in_block = 0
		row1 = row2
We need to check if a move is valid. The tile map of a shape is scanned, and we test if the tile may be moved to the new position based on if the grid cell is empty or the boundaries of the grid are exceeded.
func ok_to_move(shape: TShape, xo: int, yo: int):
	for y in shape.tsize:
		for x in shape.tsize:
			if shape.tile_map[y][x]: # Tile exists
				if x + xo < 0 or x + xo >= size.x: # Off side of grid
					return false
				if y + yo >= size.y: # Off bottom of grid
					return false
				var idx = x + xo + (y + yo) * size.x
				if idx > 0 and grid[idx]:
					return false # Occupied cell
	return true
The input to this function is the current shape and the offset that we want to apply to its position.
Now we need a function to add the tiles of a shape to the grid when the shape cannot be moved.
var step_size

func add_shape_to_grid(shape: TShape):
	step_size = shape.step_size # Useful place to set this value
	var tile_idx = 0
	for y in shape.tsize:
		for x in shape.tsize:
			if shape.tile_map[y][x]:
				var idx = x + shape.xpos + (y + shape.ypos) * size.x
				grid[idx] = true
				tiles[idx] = shape.get_child(tile_idx)
				tile_idx += 1
After calling this function from our main script, we will re-parent the tiles of the shape with the play area grid, and delete the shape node.
We make the Grid script an Autoload so that we may call its methods from our main script.
func embed_shape():
	Grid.add_shape_to_grid(tshape)
	tshape.reparent_tiles($Area)
	tshape.queue_free()
	var full_rows = Grid.get_full_rows()
	if full_rows.size() > 0:
		Grid.remove_rows(full_rows)
	add_new_shape()
We add a function to the TShape class for re-parenting the tiles and offsetting their positions to that of the original parent node.
func reparent_tiles(target_node):
	for t in get_children():
		self.remove_child(t)
		target_node.add_child(t)
		t.set_owner(target_node)
		t.position += self.position
Main
For the main scene we will extend the Controller scene.
The grid area will be a simple color rectangle called Area. The rectangle size of this is set with code based on our grid size.
We will add functions to override some Controller functions such as for movement and starting the game.
Here is the basic code:
extends Controller

var tshape
var ok

func _ready():
	$Area.rect_size = get_area_size()

func get_area_size():
	return TShapes.tshapes[0].step_size * Grid.size

func start_game():
	Grid.clear()
	add_new_shape()

func add_new_shape():
	# Get shape
	tshape = TShapes.generate()
	# Show in Area
	$Area.add_child(tshape)
	tshape.move_to(4, -2)

func resume_game():
	pass

func reset_game():
	pass

func start_moving_left():
	move(-1, 0)

func stop_moving_left():
	pass

func fast_move_left():
	move(-1, 0)

func fast_move_right():
	move(1, 0)

func start_moving_right():
	move(1, 0)

func stop_moving_right():
	pass

func move_down():
	move(0, 1)
	if not ok:
		embed_shape()

func try_rotate_left():
	tshape.rotate()
	if not Grid.ok_to_move(tshape, tshape.xpos, tshape.ypos):
		tshape.rotate(false)

func try_rotate_right():
	tshape.rotate(false)
	if not Grid.ok_to_move(tshape, tshape.xpos, tshape.ypos):
		tshape.rotate()

func hold_piece():
	pass

func hard_drop():
	ok = true
	while ok:
		move(0, 1)
	embed_shape()

func pause_game():
	timer1.stop()
	game_state = PAUSED

func quit_game():
	get_tree().quit()

func move(x, y):
	ok = Grid.ok_to_move(tshape, tshape.xpos + x, tshape.ypos + y)
	if ok:
		tshape.move(x, y)

func embed_shape():
	Grid.add_shape_to_grid(tshape)
	tshape.reparent_tiles($Area)
	tshape.queue_free()
	var full_rows = Grid.get_full_rows()
	if full_rows.size() > 0:
		Grid.remove_rows(full_rows)
	add_new_shape()
Now we may play test the game!
Still to do are:
- adjust the timing rates
- change speed with difficulty level
- detect end of game
- implement a display of the next piece to fall
- implement the hold piece feature
- add scoring
- create animations for when rows are removed
- play sounds
Hopefully that is enough to get you started and enjoy creating a Tetris like game.
To access the most up-to-date version of the code, go here: Tetrix