
3D Snake Game Tutorial
This is based on the classic snake game, but in 3D rather than 2D.
In the classic game, the player steers the continuously-moving snake towards the Apple. On eating the Apple, they get awarded points and the tail grows in length.
The game is over when the head of the Snake hits the wall or it’s own tail.
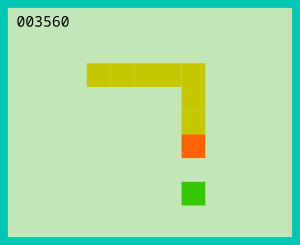
3D Snake Game
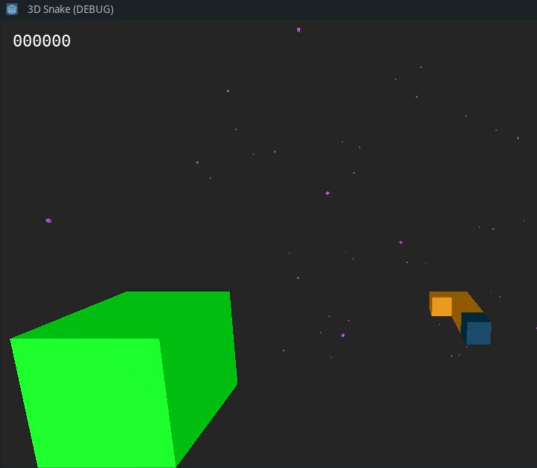
In 3D, the same game idea applies except I didn’t include walls because it’s in Space. And now it becomes harder to steer the Snake due to the 3 dimensions.
Some challenges with coding this game are:
- How to map keyboard commands to 3D movement
- How to spawn the Apple into an empty space
- How to pan the scene as the Snake moves off screen
- How to convey movement sensation as the screen pans
Assets
All we need in terms of Assets are cubes and materials. We can use a CSGBox to avoid the need for importing a cube model.
Environment
Our setting will be in outer space so we should make the background black rather than blue sky. We can do this by editing the default_env.tres settings.
Set the background mode to Clear Color and Ambient Light to White with energy of 0.52
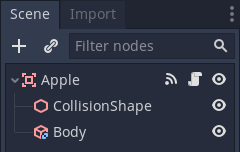
Apple
Let’s start by creating the Apple as a scene. We want a cube with collision detection. It should emit a signal when it is hit by the Snake, so we will use an Area node for this and name it Apple. We can make this our root node so that it is easy to connect the signal.
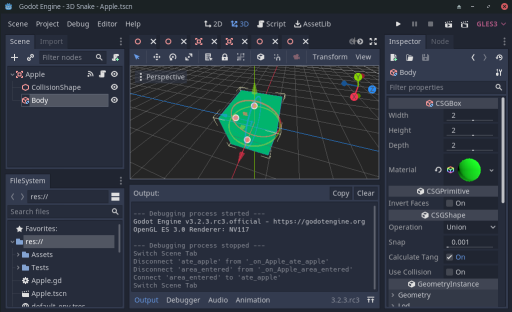
We then need to add a CollisionShape child node and set it’s shape property to a Box shape. We will stick with the default cube size.
And, to get a visible cube, we add a child node CSGBox. And for it’s material property, we create a new Spatial Material with it’s Albedo Color set to Green.
Finally, we add a new script to the root node so that we can add functions related to the Apple there.
Snake
For this, we extend a Spatial node and the child nodes will be for the Head and Tail.
For the Head we may duplicate the Apple scene and rename it to Head. In the file list panel of the Editor, right click on the apple.tscn file and select “duplicate”. Also, detach the script which we don’t need. And create a new Spatial material for the CSGBox in say a Blue color.
Then we will instance this Head scene in the Snake scene by right-clicking on the Snake root node and selecting Instance Child Scene and picking the Head Scene.
For the Tail we will add a Spatial node to act as the parent of the Tail pieces.
And we will attach a script to the Snake scene.
Tail Piece
We may duplicate the Head scene and also create a new Spatial material for the CSGBox in say a Yellow color. Since the tail pieces will be stacked along with the Head, their collision shapes should be scaled down (x0.9) so that we don’t get any unwanted collisions.
We will create new instances of the Tail scene in code when we need to add them in the Snake scene.
Assets Folder
To keep things organized, create an Assets folder and move the materials files into this folder.
Main Scene
The main scene will contain Instances of our sub scenes, a light, and a camera.
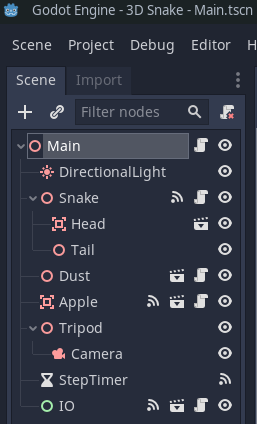
Create a new Main scene and add a Directional Light and move it to one side away from the origin.
Add an Instance of the Apple scene and move it to one side to see a Green cube.
Also add an Instance of the Snake scene.
Now add a Spatial node to the root of the Main scene and name it Tripod. And add a Camera node to this.Now move the camera back along the Z axis by 24 units. And set an x rotation on the camera of -10 degrees.
Click on the preview box of the Camera to see a view of 2 cubes. In the Camera settings, click on the Current checkbox to make sure that this camera is used as a priority.
Movement
The Snake will move in steps and be triggered by a Timer, so add a Timer node to the root and name this StepTimer. Set the Wait time to 0.2 with Autostart off and One Shot off. We will turn this timer ON and OFF from code.
We will use the Arrow keys to change the direction of the Snake head. It automatically moves forward and the player changes direction by moving it up, down, left, or right.
Since the cubes are symmetrical, there is no sense of being twisted to the side or upside down, so we will not rotate the cubes. We will only translate (move) them in steps equal to their size (2m).
We will do this looking at the scene rather than trough the eyes of the Snake. We have to move in the direction that seems most natural for the key pressed in relation to the current direction of travel of the Snake.
The Snake will move within a virtual cage of 8x8x8 units so the Camera will pan (Tripod is moved) when the Snake hits these limits. When this happens, it will look as if the Snake is still and only the Apple is moving (if in view).
To give the feeling of movement whilst panning, we will add a bunch of randomly placed dust particles that are in fixed positions relative to the root.
These particles will actually be small cubes with random rotations. As we travel though them, they will disappear into the distance, so we want to respawn them as they do this in a new position on the opposite side of the dust cloud.
When the Snake head is moved, we will fill the gap between the Head and Tail by moving the last Tail Piece into the gap. This will create the movement effect for the whole snake.
Game Play
The aim is to last as long as possible, maximizing scored points by eating the Apple many times.
If we hit the Tail with the Head then it is game over.
When the Head collides with the Apple, the Apple will emit an eaten signal. Then we should increment the score and add a piece to the Tail. This is best done when we next move the Snake where we are moving the last Tail piece to fill the gap, and we can easily add a new piece where the last piece was positioned. So we will have a counter variable to say how many Tail pieces are due to be added.
Then we should move the Apple to a new position. This will involve checking that the new position is not already occupied by any other cube, and it is not too far away from the Snake.
Control Panel
We want to have some inputs from controls and a display of the score. Let’s call it the IO scene.
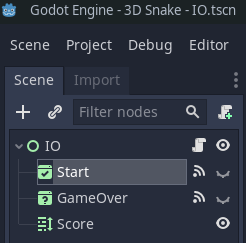
This will have a Control node as the root and children of Rich Text Label (for the score), Accept Dialog (for Instructions and Start button), and Confirmation Dialog (for Game Over message, Play again, and Cancel to quit buttons).
Testing
We can isolate some of the main features and test them independently in test scenes. This allows us to develop and test their functionality and not let bugs in these mess up our main game development.
For the Apple, we want to re-spawn it in new empty spaces so we can create a scene with objects in it and re-spawn the Apple in a loop, and observe if it gets placed in empty positions.
For the Dust, we may simulate moving the camera and observing the particles movement and respawning process.
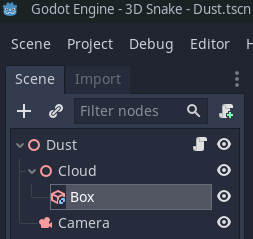
Dust Scene
This scene will inherit a Spatial node and have children of:
- A Spatial node called Cloud which will be the parent of all of our small CSGBox nodes for the dust particles.
- A camera to view the test scene
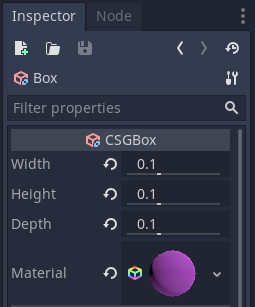
The box will have a scale of 0.1 and a purple-colored material.
We will duplicate this box in code to produce the cloud of dust particles.
Let’s attach a script and start coding.
First of all define some constants that can easily be changed later.
const NUM_PARTICLES = 50
const MAX_CLOUD_OFFSET = 16
We will duplicate the box 50 times. The particles will be spread over a volume of +-16 units in each axis (x,y,z).
In the _ready() function, we will duplicate the box.
func _ready():
	# Spawn a cloud of dust particles
	for n in NUM_PARTICLES:
		$Cloud.add_child($Cloud/Box.duplicate())
Next we will randomly position them with random rotations.
# Randomly position them
for box in $Cloud.get_children():
	box.set_translation(Vector3(get_rand_pos(), get_rand_pos(), get_rand_pos()))box.rotate(Vector3(randf(), randf(), randf()).normalized(), PI)
We create a function to return random positions in the cloud space.
func get_rand_pos():
	return rand_range(-MAX_CLOUD_OFFSET, MAX_CLOUD_OFFSET)
For the rotations, we may use the randf() function which returns values between 0 and 1.0 for the x,y,z values of a vector which we normalize so as to get a vector pointing in a random direction to rotate by.
This might produce an error if say all values were zero which is unlikely however. And since we do not randomize the seed of the random number generator, we will get the same sequence of random numbers each time, so our testing will have repeatable results.
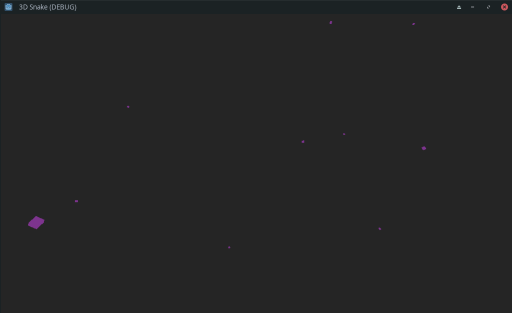
Now if we play our Dust scene (F6) by itself, we should see a random distribution of our particles after adjusting the camera position.
Next we need some functions to respawn the box positions as the camera moves.
We could write a function to calculate a new position based on how far past the limit the box is, and reposition it on the other side, inset by how far it was past. Also, it should make no change if the coordinate is within the limits. Here is such a function:
func wrap_coor(n):
	if n > MAX_CLOUD_OFFSET:
		return n - 2 * MAX_CLOUD_OFFSET
	if n < -MAX_CLOUD_OFFSET:
		return n + 2 * MAX_CLOUD_OFFSET
	return n
You can see that the function handles the 3 cases of where in the cloud space a point coordinate could be. If it is outside of the cloud, then it is shifted back by an amount equal to the width of the cloud.
However, after writing this function, I remembered seeing a wrap function in Godot: wrapf so we may use that instead.
Finally, let’s write a function to loop through the boxes and reposition them if need be.
func check_extents(base_pos: Vector3):
	for box in $Cloud.get_children():
		var pos = box.translation - base_pos
		box.translation = base_pos + Vector3(wrap_coor(pos.x), wrap_coor(pos.y), wrap_coor(pos.z))
This applies the wrap function to each of the vector coordinates of the position of the box relative to the base position (Camera Tripod base). Remember that the Tripod is set in the middle of the cloud, and the Camera is set back looking inward.
Function design notes.
The wrap function is a First Class function which means that it processes inputs and has a predictable output without influencing anything outside of it. This makes it easy to test and reliable.
We could also specify the input and output types of data. This would allow for compile time warnings of mismatching of the intended use of the function.
For example, this function is intended for use with numbers and not strings. But in our small application, we are not going to struggle to debug an issue related to this. So we keep out the clutter of type annotations in this case.
Also, to remove clutter, we return values immediately rather than only at the end of the function. In such a small function as this, it is easy to see where the exit points are.
And, if we thought that this would be a useful function to use elsewhere, we could pass in a max_offset value as a parameter rather than using our constant values which are specific to this scene.
Testing of the Dust Scene
We will create a Tests folder to hold test scenes and scripts. As a naming convention, we will name our files scene_tests.tscn or scene_tests.gd
So let’s go ahead and create a test scene. We may as well remove the Camera from our Dust scene and put one in the Test scene instead. Also, we will need an instance of the Dust scene, a Timer, and a script.
All we need to do in our test is to move the camera and call the check_extents function to update the box positions. Here is the code:
extends Spatial

func _on_Timer_timeout():
	$Camera.translation.z += 1
	$Dust.check_extents($Camera.translation)
So we connect the timer’s timeout signal to the test script. We increment the camera position in the z axis to move it towards us. Then we call the check_extents function and we should observe the effect of travelling through space.
Apple Scene
We want to detect a collision by the head of the snake with the Apple to signal that it has been eaten. So we connect the area_entered signal to the script and then emit an “eaten” signal.
extends Area

signal eaten

func _on_Apple_area_entered(_area):
	emit_signal("eaten")
Also, we want to be able to reposition the Apple after it has been eaten to give the effect of spawning a new Apple.
We want the action of moving position to be controlled by the main game scene, so we don’t do it directly from the signal handling function. We provide a function for it.
The function needs inputs of the Snake head position and an array of the positions of the tail segments. This is so that these positions may be avoided.
We will have a loop that keeps trying new random positions in space. When it finds one that is not currently occupied, it exits and moves (sets the translation value of) the Apple.
First, let’s create a function to generate a random position around the head of the Snake.
func get_point():
	# Return a value of +/-4/6/8
	var n = 4 + randi() % 5
	return n if randf() < 0.5 else -n
This first produces a random integer between 4 and 8. The % character is the modulo operator which returns the remainder of a large number that is divided by 5. So the result is between 0 and 4. Then we add 4.
Next we have a single-line if statement to randomly make it positive or negative and return the number.
randf produces numbers between 0 and 1 so we test for the number being either side of 0.5 to return the number or it’s negated value.
Now here is our set_position function:
func set_position(origin: Vector3, points_to_avoid: Array):
	# Find a suitable position in empty space
	var pos
	var finding = true
	while finding:
		# Get a random position away from the snake head
		pos = origin + Vector3(get_point(), get_point(), get_point())
		# Continue trying new positions if any of the points are too close
		finding = false
		for p in points_to_avoid:
			if (pos - p).length() < 2.2:
				finding = true
				break
	translation = pos
Testing of the Apple Scene
For this scene, we will have several boxes representing positions to avoid, a camera, a timer, and a script.
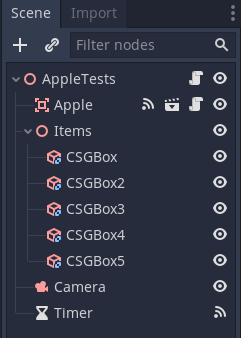
Under the Items spatial node, we duplicated a CSGBox a number of time with Ctrl+D and manually set their positions in the scene.
We set the timer to Autostart with a wait time of 0.5 and connect it’s timeout signal to the main script.
In the signal-handling function we call the set_position function. For the Snake head position we can define a Vector3 at the origin and in the _ready function create an array of our Box positions.
So here is the code:
extends Spatial

var positions_to_avoid = []
var origin: Vector3

func _ready():
	for item in $Items.get_children():
		positions_to_avoid.append(item.translation)


func _on_Timer_timeout():
	$Apple.set_position(origin, positions_to_avoid)
So when we run this test scene, we should see the Apple randomly moving around and avoiding the other boxes.
IO Scene
In this scene we will connect signals from the popup windows to the script. These signals are emitted when the buttons are pressed or the windows are closed.
For the Start window, we will connect the confirmed and popup_hide signals to the script. And in their signal-handling funtions, we will emit a start_game signal.
For the Game Over window, we will connect the confirmed signal to the script where the player pressed OK to start the game again.
In the _ready function, we will popup the Start window. Also, for the GameOver cancel button we will add code to find it and connect it’s pressed signal to the script.
func _ready():
	$Start.popup_centered()
	$GameOver.get_cancel().connect("pressed", self, "quit")
Then in the signal-handling funtion, emit an exit_game signal.
Finally, to display the score, we will update the digits of the score. We use a text format pattern such that there will be at least 6 digits with leading zeros.
func set_score(value):
	$Score.bbcode_text = "%06d" % value
The complete code is as follows:
extends Control

signal start_game
signal exit_game

func _ready():
	$Start.popup_centered()
	$GameOver.get_cancel().connect("pressed", self, "quit")


func _on_Start_confirmed():
	emit_signal("start_game")


func _on_GameOver_confirmed():
	emit_signal("start_game")


func quit():
	emit_signal("exit_game")


func set_score(value):
	$Score.bbcode_text = "%06d" % value


func game_over():
	$GameOver.popup_centered()


func _on_Start_popup_hide():
	emit_signal("start_game")
Snake Script
Now let’s add code to Snake.gd
We need a signal for when the head hits the tail.
Also, we need to preload the Tail scene.
Then we will have a variable for the direction of movement and initiaze it to the z axis vector.
Also, we will have a direction value and use enum constants to represent each direction for clarity in the code.
extends Spatial

signal hit_tail

var tail_piece_scene = preload("res://TailPiece.tscn")
var displacement = transform.basis.z
var direction = FORWARD

enum { UP, DOWN, LEFT, RIGHT, FORWARD, BACK }
Next we will add functions to the change direction of movement. These will apply different vectors depending on the current direction.
For example, a function for moving up is:
func up():
	match direction:
		UP:
			direction = FORWARD
		DOWN:
			direction = BACK
		LEFT:
			direction = UP
		RIGHT:
			direction = UP
		FORWARD:
			direction = UP
		BACK:
			direction = UP
Here we use a match statement to switch to a line of code for each of the directions. Then we set the new direction.
We will add other similar functions for down, left, and right.
func down():
	match direction:
		UP:
			direction = BACK
		DOWN:
			direction = FORWARD
		LEFT:
			direction = DOWN
		RIGHT:
			direction = DOWN
		FORWARD:
			direction = DOWN
		BACK:
			direction = DOWN


func left():
	match direction:
		UP:
			direction = FORWARD
		DOWN:
			direction = FORWARD
		LEFT:
			direction = FORWARD
		RIGHT:
			direction = BACK
		FORWARD:
			direction = LEFT
		BACK:
			direction = LEFT


func right():
	match direction:
		UP:
			direction = BACK
		DOWN:
			direction = BACK
		LEFT:
			direction = BACK
		RIGHT:
			direction = FORWARD
		FORWARD:
			direction = RIGHT
		BACK:
			direction = RIGHT
Next we want a function to decide on the displacement (distance to move) depending on the direction.
func set_displacement():
	match direction:
		UP:
			displacement = transform.basis.y
		DOWN:
			displacement = -transform.basis.y
		LEFT:
			displacement = -transform.basis.x
		RIGHT:
			displacement = transform.basis.x
		FORWARD:
			displacement = transform.basis.z
		BACK:
			displacement = -transform.basis.z
Our root node is only used to define the location of the snake in space, it is not rotated. So it’s transform.basis represents the 3D axes in space and we can use it’s x,y,z vectors as displacement values.
Another way would have been to use the Basis() function to return a set of vectors.
When placing the Apple, it needs to know the positions of the Tail pieces, so we will provide a helper function for that purpose.
func get_positions():
	var positions = []
	for item in $Tail.get_children():
		positions.append(item.translation)
	return positions
This simply loops through the child nodes of the Tail and returns an array of their positions.
Now let’s add a function to emit the hit_tail signal. We don’t make use of the signal’s function input value, so we suppress the warning message by prefixing it with an underscore char.
func hit_tail(_area):
	emit_signal("hit_tail")
And finally, we should create a function to move the Snake. This needs to move the Snake head and handle the Tail pieces.
When the Head is moved, it leaves a gap where it was, so we move the last Tail piece into this position. This gives the illusion of the whole tail moving.
Also, if there are Tail pieces to add, then we may create a new instance of a Tail piece and place it where the last Tail piece was positioned. And we connect it’s area_entered signal to our hit_tail function.
So our code starts out with inputs of a step size, and the remaining number of Tail pieces to add (if any). Then we store the current Head and Tail end positions (if there is no Tail) and move the Head.
func move_ahead(step: int, tail_segments_to_add: int) -> int:
	var old_head_pos = $Head.translation
	var end_pos = $Head.translation
	$Head.translate(displacement * step)
We also return the remaining number of Tail segments to add. I added type specifiers to make this more clear and to assist with auto-complete when using this function in the Main script.
Next we want to move the Last tail piece if there are any Tail pieces.
	var n = $Tail.get_child_count()
	if n > 0:
		var tail_piece = $Tail.get_child(n-1)
		end_pos = tail_piece.translation
		$Tail.move_child(tail_piece, 0)
		tail_piece.translation = old_head_pos
Then, if there are pieces to add, we do so, and return the number left to add.
	if tail_segments_to_add > 0:
		tail_segments_to_add -= 1
		var tpi = tail_piece_scene.instance()
		tpi.connect("area_entered", self, "hit_tail")
		tpi.translation = end_pos
		$Tail.add_child(tpi)

	return tail_segments_to_add
Finally, when a new game starts, we want to remove the Tail pieces so we provide a function to do that:
func remove_tail():
	for tail_segment in $Tail.get_children():
		tail_segment.queue_free()
So that is everything we need to control the Snake.
Main Script
The Main script provides overall control of the game.
There is very little game State to keep track of, so we only need to turn the Timer on and off to start and stop the Game.
Let’s begin by adding a signal-handler for the IO start_game signal.
func _on_IO_start_game():
	# Reset the score and chop off the tail to start a new game
	$IO.set_score(0)
	score = 0
	$Snake.remove_tail()
	tail_segments_to_add = START_TAIL_LENGTH
	set_apple_position()
	$StepTimer.start()
On the last line, we start the Timer.
And, add a signal-handler for the IO exit_game signal.
func _on_IO_exit_game():
	get_tree().quit()
This closes the application.
Now add a signal-handler for the Apple eaten signal:
func _on_Apple_eaten():
	tail_segments_to_add = 1
	score += SCORE_INCREMENT
	$IO.set_score(score)
	set_apple_position()
This sets a new Tail segment to be added, adds to the score, and repositions the Apple. And we should define a constant in our script for the Score Increment value.
Our set apple position function will pass the values for the Snake Head position and Tail positions to the Apple set_position function.
func set_apple_position():
	$Apple.set_position($Snake/Head.translation, $Snake.get_positions())
And, add a signal-handler for Snake hit_tail signal.
func _on_Snake_hit_tail():
	$StepTimer.stop()
	$IO.game_over()
This stops the game and pops up the Game over notification window.
In the Editor, select the Apple, Snake, and IO nodes, and connect the relevant signals to the main script.
Input Capture
We will check for Arrow key inputs and call the appropriate Snake movement function. Then update the Snake movement displacement value as follows:
func _input(event):
	if event is InputEventKey:
		if event.pressed:
			match event.scancode:
				KEY_RIGHT:
					$Snake.right()
				KEY_LEFT:
					$Snake.left()
				KEY_UP:
					$Snake.up()
				KEY_DOWN:
					$Snake.down()
				KEY_ESCAPE:
					get_tree().quit()
		$Snake.set_displacement()
Game Loop
When the game is running, the Timer repeatedly times out and processes the main actions as follows:
func _on_StepTimer_timeout():
	tail_segments_to_add = $Snake.move_ahead(STEP_SIZE, tail_segments_to_add)
	move_camera()
	$Dust.check_extents($Tripod.translation)
Camera Movement
Here we get a Vector between the Snake Head and the Camera Tripod. Then we compare the x,y,z values of distance along each axis against the size of an imaginary box.
If the distance is too far, then we move the Camera such as to maintain the maximum offset at the box extents.
func move_camera():
	# Move camera with snake head at extents of movement box
	var st = $Snake/Head.translation
	var tt = $Tripod.translation
	var offset = st - tt
	if offset.x > MAX_OFFSET:
		tt.x = st.x - MAX_OFFSET
	if -offset.x > MAX_OFFSET:
		tt.x = st.x + MAX_OFFSET
	if offset.y > MAX_OFFSET:
		tt.y = st.y - MAX_OFFSET
	if -offset.y > MAX_OFFSET:
		tt.y = st.y + MAX_OFFSET
	if offset.z > MAX_OFFSET:
		tt.z = st.z - MAX_OFFSET
	if -offset.z > MAX_OFFSET:
		tt.z = st.z + MAX_OFFSET
	$Tripod.translation = tt
I avoid if else here to keep the code tidy.
Wrap Up
So that is all apart from some bits and pieces at the start of the Main.gd script:
extends Spatial

const MAX_OFFSET = 8
const STEP_SIZE = 2
const START_TAIL_LENGTH = 4
const SCORE_INCREMENT = 950

var tail_segments_to_add: int
var score = 0
Find the Code Repository here: 3D Snake
Taking it Further
This tutorial was meant to teach the basics of creating a 3D game. But to make the game more fun and polished, here are some ideas for you to think about pursuing:
If the Snake loses sight of the Apple, then it can be difficult to find it. So there could be a teleport action to get the snake back near the Apple. Or you could display pulsating arrows at the edges of the screen to prompt the player to move in that direction towards the Apple.
You could add sound effects and a background music track.
The cubes could be replaced by more interesting models such as beveled-edge cubes, and the Snake could have a face.
There could be multiple Apples, some of them poisonous.
I leave it up to your imagination. Thanks for reading!