
Game Of Life in Godot
This tutorial will cover the classic Game of Life implemented in GDScript. It simulates the evolution of cells according to some simple rules based on living, dying, and reproducing.
Wikipedia Article about Game Of Life
The cells populate a 2D grid and the game starts with an initial population of cells forming a starting pattern. On each generation, the rules are applied to all cells at the same time to generate the next pattern.
Rules for Conway’s Game of Life
- A cell lives if it has two or three live neighbors
- A dead cell with three live neighbors is re-born
- All other cells die or remain dead
Design considerations
We want to display live or dead cells in a 2D grid arrangement and this may extend beyond the boundaries of the screen.
So we may want to zoom the camera in and out and pan around.
We want to set the speed of the generations.
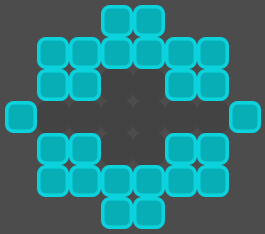
We need a Texture to display the cells. This should be monochrome, and we will modulate its color to indicate Alive or Dead status.
Be able to place cells for the initial population.
Be able to start, stop, and reset the game.
Programming considerations
Cells are only added to a grid and have two states (alive or dead). The state may be represented by a Boolean value of True or False.
The Grid will grow to an unknown size, so we may use a Dictionary for storing the state of the grid. The Keys will be formed from the grid coordinates which will be a Vector2 value.
When scanning the cells, we simply loop through the dictionary entries.
for key in cells.keys():
	var cell = cells[key]
When updating the status of each cell, we need to copy it to another dictionary since the effects are supposed to apply to all cells simultaneously. We may alternate between two dictionaries and make use of the clear function on each generation.
# Define an array of 2 dictionaries
var grids = [{}, {}]
We may use the invert array function to flip the order of the dictionaries on each generation where the latest version is at index zero.
We will need a function to count the number of live cells surrounding a cell. So we develop a simple algorithm to do this:
- Get current cell coordinates (encoded in the key)
- Loop through the 8 neighboring cell coordinates
- Count the neighboring cell if its value is true (alive)
- Determine if the current cell should be made dead or reborn
Code to scan neighbor cells:
var num_live_cells = 0
for y in [-1, 0, 1]:
	for x in [-1, 0, 1]:
		if x != 0 or y != 0:
			var new_pos = pos + Vector2(x, y)
			if grids[0].has(new_pos):
				if grids[0][new_pos]: # If alive
					num_live_cells += 1
Coding tip: when scanning nested loops, we tend to traverse the matrix in reverse index order so that we may reset the column (x) and increment the row (y) position rather than multiplying if we feel the need to optimize speed later.
After this we will set grids[1][key] to Alive or Dead status according to the rules, then set the color modulation of the Cell in the Scene.
Implementation
We will create a 2D scene based on Node2D and attach a script.
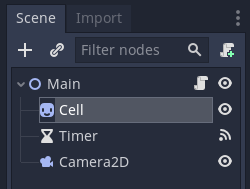
Using a Camera2D (set to current) we may implement panning and zoom.
The mouse may be used to click and set initial cells.
Our Cell may be a 32×32 pixel Sprite which we will duplicate.
We may use a Timer to time the generations.
Here is code to capture the mouse input:
const ZOOM_STEP = 0.1

func _unhandled_input(event):
   if event is InputEventMouseButton:
   	if event.button_index == BUTTON_LEFT and event.pressed:
   		place_cell(event.position)
   	if event.button_index == BUTTON_RIGHT and event.pressed:
   		remove_cell(event.position)
   	if event.button_index == BUTTON_WHEEL_DOWN:
   		change_zoom(ZOOM_STEP)
   	if event.button_index == BUTTON_WHEEL_UP:
   		change_zoom(-ZOOM_STEP)
   if event is InputEventMouseMotion and event.button_mask == BUTTON_MASK_MIDDLE:
   		move_camera(event.relative)

var zoom = 1.0

func change_zoom(dz: float):
   zoom = clamp(zoom + dz, 0.1, 8.0)
   $Camera2D.zoom = Vector2(zoom, zoom)

func move_camera(dv: Vector2):
   $Camera2D.offset -= dv

func place_cell(_pos: Vector2):
   pass

func remove_cell(_pos: Vector2):
   pass
When placing Cells, we will store them in a dictionary with keys of their positions to allow for easy reference.
When clicking the left mouse button, we will place a new cell snapped to a grid. The grid cell size will be the same as the Cell size (32).
When clicking the right mouse button, we may get the key and delete the Cell by removing its Dictionary entry and removing the Node from the scene with queue_free.
Let’s use the keyboard to start and stop the game, and also to reset the scene.
Keyboard Input
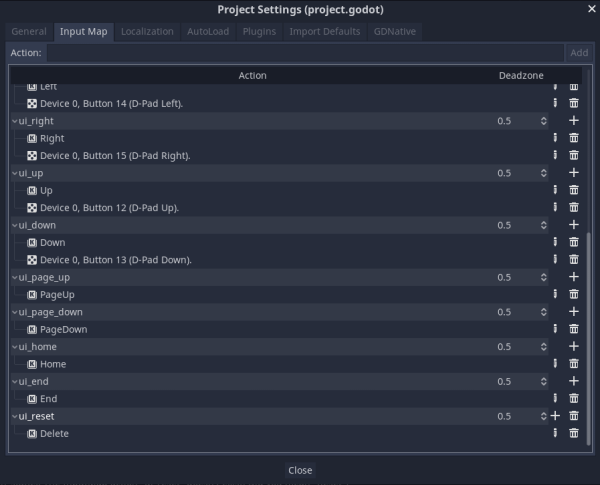
We will add some code to the _unhandled_input function to respond to the Space bar or Enter key for activating the Start/Stop function and the Delete key for the Reset action.
The Key Mappings are defined in the Editor Project Settings. We need to add a new entry called ui_reset and make it respond to pressing the Delete key.
func _unhandled_input(event):
	if event is InputEventMouseButton:
		if event.button_index == BUTTON_LEFT and event.pressed:
			place_cell(event.position)
		if event.button_index == BUTTON_RIGHT and event.pressed:
			remove_cell(event.position)
		if event.button_index == BUTTON_WHEEL_DOWN:
			change_zoom(ZOOM_STEP)
		if event.button_index == BUTTON_WHEEL_UP:
			change_zoom(-ZOOM_STEP)
	if event is InputEventMouseMotion and event.button_mask == BUTTON_MASK_MIDDLE:
			move_camera(event.relative)
	if event.is_action_pressed("ui_cancel"):
		get_tree().quit()
	if event.is_action_pressed("ui_accept"):
		start_stop()
	if event.is_action_pressed("ui_reset"):
		reset()

func start_stop():
	pass

func reset():
	pass
Control Code
To start and stop (pause) the game we simply start (if there are some cells) and stop the timer.
func start_stop():
	if $Timer.is_stopped() and cells.size() > 0:
		$Timer.start()
	else:
		$Timer.stop()
We connect the timer to our main script in order to regenerate the cells each time the time times out.
func _on_Timer_timeout():
	grids.invert()
	grids[1].clear()
	# Process the game rules
To reset, we stop the timer, erase the cells, and clear the dictionary 1 (flipped to index 0 on Timer timeout).
func reset():
	$Timer.stop()
	for key in cells.keys():
		cells[key].queue_free()
	grids[1].clear()
	cells.clear()
Debugging
Add dummy place_cell and remove_cell functions.
Now we should test our game by inserting print statements at the end of the functions to write messages to the Output window of the Editor.
Run the game and press the space bar to start and stop the timer. Also, press the Delete key and observe our diagnostic messages. We should also look for any error messages and then fix problems.
The next step is to add code to place and remove cells.
func place_cell(pos: Vector2):
	pos = get_grid_pos(pos)
	var cell = $Cell.duplicate()
	cell.position = pos * 32
	add_child(cell)
	cell.show()
	cells[pos] = cell
	grids[1][pos] = true

func get_grid_pos(pos: Vector2) -> Vector2:
	return pos.snapped(Vector2(32, 32)) / 32
In the above code we get the Mouse position and snap this to our grid using the Vector2 snap method. We created a re-useable function for this.
We duplicate the Cell, set its position, add it as a child node to the scene, and make it visible. Then we calculate its key value.
The position vector uses floats which we cast to ints in our utility function.
We add the reference to our new cell in the cells dictionary and mark it as Alive in our grids[1] dictionary. This dictionary represents the latest state of the cell population. On each tick of the game, it gets swapped to grids[0] to start the regeneration process.
For more interactive fun, we will let the Player add and remove cells whilst the Game is running.
Now add a function to remove a Cell.
func remove_cell(pos: Vector2):
	var key = get_grid_pos(pos)
	# Check if user clicked in occupied position
	if cells.has(key):
		cells[key].queue_free()
		cells.erase(key)
		grids[1].erase(key)
Here we derive the key from the mouse position and check if the cells dictionary contains this key. It will not contain the key if the Player clicks in empty space. If so, we remove the Cell from the scene and delete its entry in the dictionaries.
One thing to consider is if we choose to make Dead Cells invisible, they will be removed and affect the surrounded Cells maybe unexpectedly.
Now, what happens if the Player left-clicks on an existing Cell? It looks like a new Cell will be added in the same position and the other Cell will no longer be referenced, so will persist. We might discover this later as a bug.
So, let’s check if the position is occupied before we add a Cell.
	var key = get_grid_pos(pos)
	if not cells.has(key):
		var cell = $Cell.duplicate()
		cell.position = key * 32
		add_child(cell)
		cell.show()
		cells[key] = cell
		grids[1][key] = true
Now we are able to Add and Remove Cells.
Pan and Zoom
When Zooming and Panning the Mouse position loses sync with the placement point on the Grid, so we need to account for this.
To correct for Panning offset we may add the Camera offset to the Mouse position. Also, we should divide the offset by the Camera zoom value. And, we want the zero of our coordinate system to be in the middle of the viewport so that we zoom in and out from the middle.
We may set the zero coordinate to the center of the Camera by setting the Camera’s Anchor Mode to Drag Center in the Inspector.
Then we will modify the place_cell function.
func place_cell(pos: Vector2):
	# Convert mouse position to camera view coordinates
	pos = mouse_pos_to_cam_pos(pos)
	var grid_pos = get_grid_pos(pos)
	if not cells.has(grid_pos):
		add_new_cell(grid_pos)

func mouse_pos_to_cam_pos(pos):
	return pos + $Camera2D.offset / $Camera2D.zoom - get_viewport_rect().size / 2
We get the mid-point of the viewport with get_viewport_rect().size / 2.
Now the Mouse position aligns with the Placement point when panning and zooming.
The get_grid_pos function now needs to take into account the zoom level because the number of pixels per grid will be changed.
func get_grid_pos(pos: Vector2) -> Vector2:
	var pixels = 32.0 / $Camera2D.zoom.x
	return pos.snapped(Vector2(pixels, pixels)) / pixels
Re-generating the Population
For this we want to loop over the Cells, count the number of live Cells surrounding them, and apply the Rules to set the Cell status in the grids[1] dictionary to indicate Alive or Dead.
func regenerate():
	for key in cells.keys():
		var n = get_num_live_cells(key)
		if grids[0][key]: # Alive
			grids[1][key] = (n == 2 or n == 3)
		else: # Dead
			grids[1][key] = (n == 3)

func get_num_live_cells(pos: Vector2):
	var num_live_cells = 0
	for y in [-1, 0, 1]:
		for x in [-1, 0, 1]:
			if x != 0 or y != 0:
				var new_pos = pos + Vector2(x, y)
				if grids[0].has(new_pos):
					if grids[0][new_pos]: # If alive
						num_live_cells += 1
	return num_live_cells
Note that it is easy to get the position of surrounding Cells by adding an offset vector to the current position.
After regenerating, we should update the Cells in the Population.
func update_cells():
	for key in cells.keys():
		cells[key].modulate = Color.aqua if grids[1][key] else Color.gray
And call these functions from the Timer handler.
func _on_Timer_timeout():
	grids.invert()
	grids[1].clear()
	regenerate()
	update_cells()
Spawning New Cells
We forgot to check for conditions to spawn new Cells.
To do this: when scanning neighbor positions, if the key is not registered, then we can add it to a list of additional positions to check.
var to_check = []

func get_num_live_cells(pos: Vector2, first_pass = true):
	var num_live_cells = 0
	for y in [-1, 0, 1]:
		for x in [-1, 0, 1]:
			if x != 0 or y != 0:
				var new_pos = pos + Vector2(x, y)
				if grids[0].has(new_pos):
					if grids[0][new_pos]: # If alive
						num_live_cells += 1
				else:
					if first_pass:
						to_check.append(new_pos)
	return num_live_cells
I added a first_pass input parameter to this function since we will call it again when checking the additional positions to check, and we don’t want to add any more positions then.
We write a new function to possibly spawn new cells in the new positions.
func add_new_cells():
	for pos in to_check:
		var n = get_num_live_cells(pos, false)
		if n == 3 and not grids[1].has(pos):
			add_new_cell(pos)
	to_check = []
The add_new_cell function.
func add_new_cell(grid_pos):
	var pos = grid_pos * 32.0
	var cell = $Cell.duplicate()
	cell.position = pos
	add_child(cell)
	cell.show()
	cells[grid_pos] = cell
	grids[1][grid_pos] = true
Then, add the add_new_cells function to the Timer handler.
func _on_Timer_timeout():
	grids.invert()
	grids[1].clear()
	regenerate()
	add_new_cells()
	update_cells()
Additional Features
So we have covered all that we need to implement the Game of Life in Godot Engine.
Some extra features to add could be:
- Export settings for colors
- Display Running/Stopped status