
How to Make a Godot Plugin
This tutorial will cover Editor plugins using GDScript rather than those using GDNative or for Android.
Plugins may extend the editor’s functionality such as adding new Node types, adding specialized Docks, or other useful features.
Plugins are added to a project by including the plugin directory of files to an addons directory in the root of the project folder.
In the Editor we may search for plugins available in the Asset Store and install them directly in the Editor. Then enable the plugin in the Project Settings.
Plugins are distributed as ZIP archives.
Plugin Setup
Using the Editor go to Project Settings -> Plugins -> Create New Plugin to open the Create a Plugin dialog.
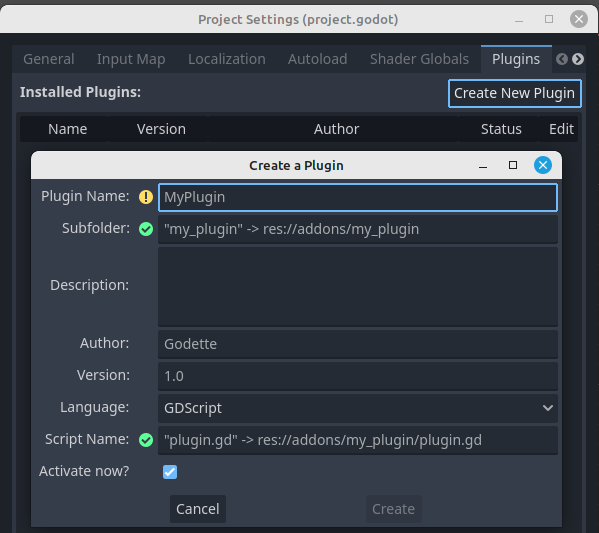
Fill in the details for your plugin and press Create.
For the subfolder and script name, you don’t need to include the path.
The version number refers to the tag that you assign to the version of your code repository (or a version number that you make up)
This will create 2 files: plugin.cfg and plugin.gd in the addons\my_plugin folder.
The plugin.cfg ini file contains the metadata that you entered into the dialog. To access this file from Godot 3.x: right-click on the addons\my_plugin folder in the Editor and choose Open in File Manager, then click on plugin.cfg to open it in your default Text editor.
The Godot Editor should now have opened plugin.gd and you can see the basic code template for your plugin.
tool
extends EditorPlugin

func _enter_tree():
    # Initialization of the plugin goes here.
    pass

func _exit_tree():
    # Clean-up of the plugin goes here.
    pass
@tool
extends EditorPlugin

func _enter_tree():
    # Initialization of the plugin goes here.
    pass

func _exit_tree():
    # Clean-up of the plugin goes here.
    pass
Notice the tool (@tool in Godot 4.x) keyword. This allows the code to run in the Editor. Also, it must extend the EditorPlugin class.
Create a Custom Node
We may create a custom node that will appear in the Create New Node dialog of the Editor.
This will require an icon which will be 16 x 16 pixels and called icon.png. Also, we need to decide what parent node type to specify for where to place our custom node in the tree of available nodes.
Here is a code template for plugin.gd that loads our icon and the script that implements our logic.
tool
extends EditorPlugin

const NODE_NAME = "LabelButton"
const INHERITANCE = "Button"
const THE_SCRIPT = preload("label_button.gd")
const THE_ICON = preload("icon.png")

func _enter_tree():
	add_custom_type(NODE_NAME, INHERITANCE, THE_SCRIPT, THE_ICON)

func _exit_tree():
	remove_custom_type(NODE_NAME)
@tool
extends EditorPlugin

const NODE_NAME = "LabelButton"
const INHERITANCE = "Button"
const THE_SCRIPT = preload("label_button.gd")
const THE_ICON = preload("icon.png")

func _enter_tree():
	add_custom_type(NODE_NAME, INHERITANCE, THE_SCRIPT, THE_ICON)

func _exit_tree():
	remove_custom_type(NODE_NAME)
preload loads fixed resources as soon as possible. _enter_tree is called when the node is enabled in the Editor Project Settings -> Plugins dialog area. _exit_tree is called when the node is disabled.
The script runs whenever the file is saved or the project is opened because of the tool instruction.
The logic code for our node will be put in a file that reflects the name of our node, in this case LabelButton with a file name of label_button.gd. It may extend any other node and doesn’t have to be a Tool script.
Order of execution
There are various scenarios to consider when using a Tool script.
- Adding the custom node to the scene tree
- Editing the script code
- Changing an export value
- Running the scene
They affect when and in what order functions are called.
In case 1, _ready is called when the node is added to the tree. Export setter functions are not called because the default values are used.
In case 2, _ready is not called when the script is saved, but export setter functions are called several times (by observation of the Output window print messages), and the child nodes may not be ready until the last of the calls.
In case 3, the export setter function is called.
In case 4, export setter functions are called if the value is not the default value, followed by _ready.
We may set up child nodes in the _ready function, and access them from export setter functions. This works fine in Editor mode, but breaks when we run the scene because the child nodes get set up after the export setter functions are called.
So we need to disable access to child nodes from export setter functions when we run the scene. We may do this by checking the boolean (true/false) value of the Engine.editor_hint property (Engine.is_editor_hint() in Godot 4.x) in our Tool script. If it is true then we are in Editor mode, else the scene is running.
Example code
In the following example, we will extend a Button, add a Label, and include an export var that may be used in the editor to make changes to our Label in real time, so we will add the tool keyword to our script.
Various print statements are added to send debug text to the Output window.
tool
extends Button

export var label_text = "Hello" setget set_txt

func _init():
	print("_init")

func _ready():
	print("_ready")
	var label = Label.new()
	label.rect_position.y = 50
	label.text = label_text
	add_child(label)

func set_txt(txt):
	prints("set_txt", txt)
	label_text = txt
	if Engine.editor_hint:
		if get_child_count() > 0:
			get_child(0).text = txt
			print("Set label text")
@tool
extends Button

@export var label_text = "Hello": set = set_txt

func _init():
	print("_init")

func _ready():
	print("_ready")
	var label = Label.new()
	label.position.y = 50
	label.text = label_text
	add_child(label)

func set_txt(txt):
	prints("set_txt", txt)
	label_text = txt
	if Engine.is_editor_hint() and get_child_count() > 0:
		get_child(0).text = txt
		print("Set label text")
Interestingly, the label is not displayed in the Scene Tab of the Editor, but is found in the Scene Remote Tab when the scene is running.
This scene simply displays a button with a text label below it for demonstration purposes.
We may also preload a scene and add an instance of it as a child in the ready function.
tool
extends Button

export var label_text = "Hello" setget set_txt

const scene = preload("IconScene.tscn")

func _init():
	print("_init")

func _ready():
	print("_ready")
	var label = Label.new()
	label.rect_position.y = 50
	label.text = label_text
	add_child(label)
	add_child(scene.instance())

func set_txt(txt):
	prints("set_txt", txt)
	label_text = txt
	if Engine.editor_hint:
		if get_child_count() > 0:
			get_child(0).text = txt
			print("Set label text")
@tool
extends Button

@export var label_text = "Hello": set = set_txt

const scene = preload("IconScene.tscn")

func _init():
	print("_init")

func _ready():
	print("_ready")
	var label = Label.new()
	label.position.y = 50
	label.text = label_text
	add_child(label)
	add_child(scene.instance())

func set_txt(txt):
	prints("set_txt", txt)
	label_text = txt
	if Engine.is_editor_hint() and get_child_count() > 0:
		get_child(0).text = txt
		print("Set label text")
Remember that the _ready function in Editor mode only runs when the custom node is added to the scene. So after changing the code you should delete the node and add it again. But that will reset the export values to their default values.
To work around this problem, you could avoid having any code in the _ready function that directly sets up the scene. Put that code into a separate function that is called from the _ready function and implement an export boolean whose setter calls this function when its boolean value is changed.
So, good luck and have fun creating Godot Plugins. Share the link to this tutorial on social media.
Submitting to the Asset Library
In the Official Docs, there is a useful guide about Submitting to the Asset Library.
My extra tips are:
Create a .gitattributes file
This is mentioned in the official Docs. But you are able to include wildcard * characters in the file paths. The idea is to only have the .zip file download from GitHub include the /addons path files containing your plugin, license, and read.me files. I guess that you want to avoid the user downloading unnecessary files just to get your plugin into their project.
The root of your repo will be a Godot Project containing the /addons, a Demo scene and maybe tests. This code repository is linked to from the Asset Library via a button to see all the files.
Assign a release tag to your plugin
After committing your code in your Git Repository, it will have a commit hash (40 character string) which is used to reference your plugin when submitting it. Also, you may include a version number. To add this tag from the command line you use git tag v1.0 for example. And to update your server repository to recognize this number do git push origin <tagname>.
Then, in GitHub you may create a release based on this tag. A release seems to be just the act of adding more information associated with a particular tagged commit.
Then you have a version tag and the commit hash available to enter into the Asset Library submit form.
Create an Icon
This is likely the same icon as used by your Project which needs to be at least 80 pixels square (for display in the Asset Library). But bigger than the Plugin icon that is 16 pixels square (because it shows up in the Node Tree). My recommendation is to make an icon with dimensions of 256 pixels square. You can design it in Inkscape as an SVG graphic and export it at a particular sized PNG file.
My Asset Library Contributions
You can check out my submissions to the Godot Asset Library here
More solutions
- Godot Keyboard and Mouse Button Input Programming
- Godot Event Handling
- Signals in Godot
- How to Save and Load Godot Game Data
- Godot Timing Tutorial
- Using Anchor Positioning in Godot
- UI Layout using Containers in Godot
- Shaders in Godot
- Godot State Machine
- Godot Behaviour Tree
- Godot Popups
- Parsing XML Data
- Godot Parallax Background
- Godot Regex - Regular Expressions
- Random Numbers
- Coroutines, Await and Yield
- GraphNode and GraphEdit Tutorial