
GraphNode and GraphEdit Tutorial
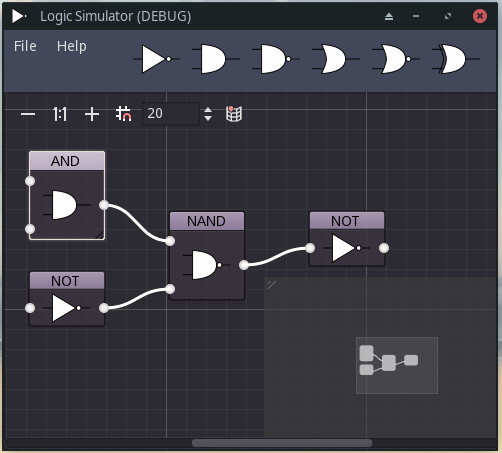
The GraphNode is a Node that may be configured with inputs and outputs and connections made between the Nodes. The GraphEdit Node is used to display a grid or blank area to place the GraphNodes on.
The GraphEdit is a Container Node where its Size Flags may be set to expand it out to fill the screen. A set of Tool Buttons are provided to adjust the zoom level, reset the zoom, change the grid spacing, turn grid snapping on/off, and show or hide a panel to allow for panning around the grid. And you can pan around the grid by holding the middle mouse button.
To add extra Tool buttons there is a get_zoom_hbox method to get a reference to the HBoxContainer of the Toolbar so that you may add child Nodes to it.
We will use the Methods and Signals of the GraphEdit Node for all the functionality that we need. GraphNodes are added as child Nodes in the top left corner yet setting their rectangle position will not work because the container of the GraphEdit Node takes control of positioning. But, to initially place a Node, we may set its offset value. This may be based on the mouse position where we might click on a button to generate a new GraphNode.
var node := GraphNode.new()
get_node("Graph").add_child(node)
node.offset.x = get_viewport().get_mouse_position().x
var node := GraphNode.new()
get_node("Graph").add_child(node)
node.position_offset.x = get_viewport().get_mouse_position().x
Customizing GraphNodes
GraphNodes have inputs and outputs called ports. These have a type specified by an integer value and connections can only be made from an output port to an input port with the same type number. Inputs are on the left side of the Node and outputs are on the right side.
Control-based child nodes are added as children to create a stack of slots in the tree of the GraphEdit node. These slots allow for configuring input and output ports with a type and pin color.
Note that slots are indexed by their position in the stack of slots, but ports are indexed by their enabled pin number starting from zero.
To add slots, we need to add child Control Nodes. Plain Control nodes are added when they should be invisible, but set their min_size_y value to set the spacing between connection pins. These pins are displayed as dots by default and may have a color which affects the color of an attached wire (interpolated between start and end colors).
We may also use any other kind of Control such as a TextureRect, LineEdit, Button etc.
When a child Control Node is added to the GraphNode, an input (left side) and an output (right side) port is available and needs to be enabled in the inspector for it to show up as an available port.
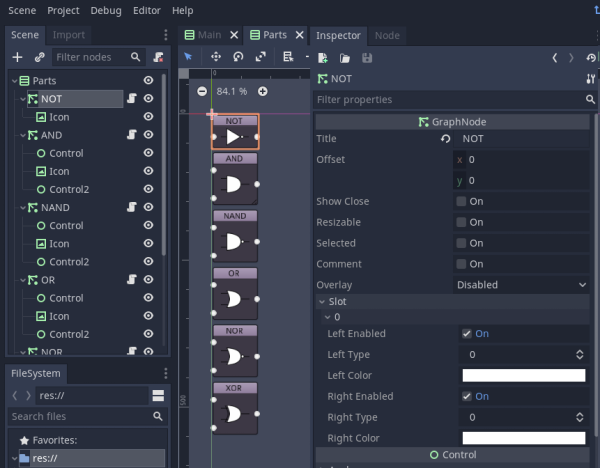
It’s a good idea to set up a separate scene in your project based on a Control Node and add a few GraphNodes to it. Then customize each one according to your needs. Give them names for later reference. Now save this scene and make it an Auto-load scene. Let’s call it “Parts”. And we should hide this scene in the ready function of our main script.
func _ready():
	Parts.hide()
So to get a new GraphNode to add, we may do this:
func add_part(node_name: String):
	var part: GraphNode = Parts.get_node(node_name).duplicate()
	get_node("Graph").add_child(part, true) # Use a friendly node name to help with save/load later
	part.offset.x = get_viewport().get_mouse_position().x
func add_part(node_name: String):
	var part: GraphNode = Parts.get_node(node_name).duplicate()
	get_node("Graph").add_child(part, true) # Use a friendly node name to help with save/load later
	part.position_offset.x = get_viewport().get_mouse_position().x
We can call this function from a Button press handler for example.
Making connections between GraphNodes
In the GraphEdit properties, enable right_disconnects so that we may click on an input connection to disconnect a wire.
When we click and drag on an output port, we get hold of a wire that snaps towards input ports that we are able to connect to. This triggers a connection_request signal that we need to connect to. And we may then make the connection in code as follows:
func _on_Graph_connection_request(from, from_port, to, to_port):
	get_node("Graph").connect_node(from, from_port, to, to_port)
func _on_connection_request(from_node, from_port, to_node, to_port):
	get_node("Graph").connect_node(from_node, from_port, to_node, to_port)
Note that we may connect many wires from an output, and many wires to an input. Maybe we will only allow one input connection? To facilitate this we need to scan the connection list looking for the name of our Node and the port number to see if there is an existing connection or not. So we will modify our function like so:
func _on_Graph_connection_request(from, from_port, to, to_port):
	# Don't connect to input that is already connected
	for con in get_node("Graph").get_connection_list():
		if con.to == to and con.to_port == to_port:
			return
	get_node("Graph").connect_node(from, from_port, to, to_port)
func _on_connection_request(from_node, from_port, to_node, to_port):
	# Don't connect to input that is already connected
	for con in get_node("Graph").get_connection_list():
		if con.to == to_node and con.to_port == to_port:
			return
	get_node("Graph").connect_node(from_node, from_port, to_node, to_port)
To disconnect, we click on an input port and respond to the disconnection_request signal from the GraphEdit Node.
func _on_Graph_disconnection_request(from, from_port, to, to_port):
	get_node("Graph").disconnect_node(from, from_port, to, to_port)
func _on_disconnection_request(from_node, from_port, to_node, to_port):
	get_node("Graph").disconnect_node(from_node, from_port, to_node, to_port)
Deleting GraphNodes
To delete GraphNodes, we need to select them and press the Delete key. We may select Nodes individually or in a group. When nodes are selected, they emit the node_selected signal from the GraphEdit Node. And when a Node is unselected, the node_unselected (Godot 4: node_deselected) signal is emitted from the GraphEdit Node.
So we must keep track of the selected status of Nodes. We may do this by adding a reference to the Node as a Dictionary key with the value as a boolean indicating selected or unselected. Luckily, this is very easy to do with a Dictionary.
var selected_nodes = {}

func _on_Graph_node_selected(node):
	selected_nodes[node] = true

func _on_Graph_node_unselected(node):
	selected_nodes[node] = false
var selected_nodes = {}

func _on_Graph_node_selected(node):
	selected_nodes[node] = true

func _on_Graph_node_deselected(node):
	selected_nodes[node] = false
When we press the Delete key, the delete_nodes_request signal is emitted from the GraphEdit Node. We respond to this by deleting all the Nodes that are selected as follows:
func _on_Graph_delete_nodes_request():
	for node in selected_nodes.keys():
		if selected_nodes[node]:
			node.queue_free()
	selected_nodes = {}
# _nodes is a list of nodes that have a close button
func _on_Graph_delete_nodes_request(_nodes):
	for node in selected_nodes.keys():
		if selected_nodes[node]:
			node.queue_free()
	selected_nodes = {}
When we try this out, the Nodes are deleted, but their connections remain, and we get errors when the Graph cannot find the ports that the wires connect to. The connections disappear when you pan the Graph. But we should remove the connections before deleting the nodes to do this cleanly.
The GraphEdit Node stores a list of all connections, so we may work through this list to find any connections associated with Nodes that are to be deleted and remove these connections. So we will add a remove_connections_to_node function to our script.
func remove_connections_to_node(node):
	for con in get_node("Graph").get_connection_list():
		if con.to == node.name or con.from == node.name:
			get_node("Graph").disconnect_node(con.from, con.from_port, con.to, con.to_port)

func _on_Graph_delete_nodes_request():
	for node in selected_nodes.keys():
		if selected_nodes[node]:
			remove_connections_to_node(node)
			node.queue_free()
	selected_nodes = {}
func remove_connections_to_node(node):
	for con in get_node("Graph").get_connection_list():
		if con.to == node.name or con.from == node.name:
			get_node("Graph").disconnect_node(con.from, con.from_port, con.to, con.to_port)

func _on_Graph_delete_nodes_request(_nodes):
	for node in selected_nodes.keys():
		if selected_nodes[node]:
			remove_connections_to_node(node)
			node.queue_free()
	selected_nodes = {}
Capturing the Graph for saving
Two of the child nodes are not GraphNodes, so we need to avoid trying to save those nodes. Here is some code to capture the details of the Graph that we are interested in when saving:
To capture the items of interest for each node, we may create a Resource. This is a class extending a Resource and defined in a GDScript file.
extends Resource

class_name NodeData

export var name: String
export var type: String
export var offset: Vector2
export var data = {}
extends Resource

class_name NodeData

@export var name: String
@export var type: String
@export var offset: Vector2
@export var data = {}
When saving we may scan our GraphNodes and create new instances of this NodeData Resource and copy the relevant data to its exported properties.
And we may create another Resource to capture the graph details.
extends Resource

class_name GraphData

export var connections: Array
export var nodes: Array
extends Resource

class_name GraphData

@export var connections: Array
@export var nodes: Array
We may use the ResourceSaver singleton with its save method to save the graph resource object to disk. The file name needs to be something.res.
func save_data(file_name):
	var graph_data = GraphData.new()
	graph_data.connections = $Graph.get_connection_list()
	for node in $Graph.get_children():
		if node is GraphNode:
			var node_data = NodeData.new()
			node_data.name = node.name
			node_data.type = node.type
			node_data.offset = node.offset
			node_data.data = node.data
			graph_data.nodes.append(node_data)
	if ResourceSaver.save(file_name, graph_data) == OK:
		print("saved")
	else:
		print("Error saving graph_data")
func save_data(file_name):
	var graph_data = GraphData.new()
	graph_data.connections = $Graph.get_connection_list()
	for node in $Graph.get_children():
		if node is GraphNode:
			var node_data = NodeData.new()
			node_data.name = node.name
			node_data.type = node.type
			node_data.offset = node.offset
			node_data.data = node.data
			graph_data.nodes.append(node_data)
	if ResourceSaver.save(graph_data, file_name) == OK:
		print("saved")
	else:
		print("Error saving graph_data")
Loading the Graph data from a file
This code includes error checking for the data and file path.
func load_data(file_name):
	if ResourceLoader.exists(file_name):
		var graph_data = ResourceLoader.load(file_name)
		if graph_data is GraphData:
			init_graph(graph_data)
		else:
			# Error loading data
			pass
	else:
		# File not found
		pass
Initializing the Graph from data
If we saved our data in the format above, we may restore the Graph as follows:
func init_graph(graph_data: GraphData):
	clear_graph()
	for node in graph_data.nodes:
		# Get new node from factory autoload (singleton)
		var gnode = PartFactory.get_node(node.type)
		gnode.offset = node.offset
		gnode.name = node.name
		get_node("Graph").add_child(gnode)
	for con in graph_data.connections:
		var _e = get_node("Graph").connect_node(con.from, con.from_port, con.to, con.to_port)

func clear_graph():
	get_node("Graph").clear_connections()
	var nodes = get_node("Graph").get_children()
	for node in nodes:
		if node is GraphNode:
			node.queue_free()
Changing the Theme
The GraphNode uses an image for the entire background of the node in the same way as the NinePatchRect works. This and other styles may be changed in the Theme Override properties in the Inspector panel.
Example Graph
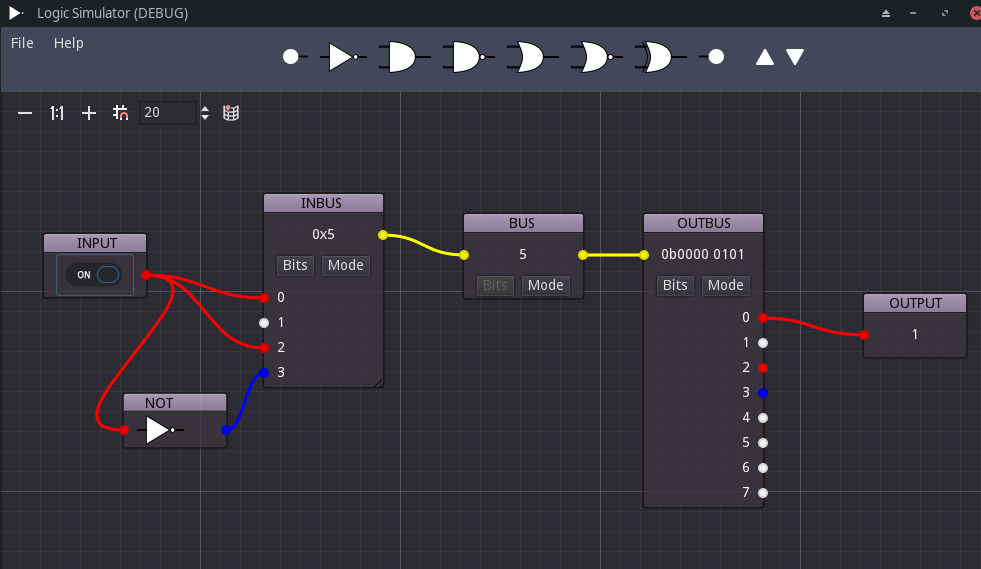
That concludes my tutorial on the basics of how to use the GraphNode and GraphEdit Nodes in Godot Engine.
More solutions
- Godot Keyboard and Mouse Button Input Programming
- Godot Event Handling
- Signals in Godot
- How to Save and Load Godot Game Data
- Godot Timing Tutorial
- Using Anchor Positioning in Godot
- UI Layout using Containers in Godot
- Shaders in Godot
- Godot State Machine
- Godot Behaviour Tree
- Godot Popups
- Parsing XML Data
- Godot Parallax Background
- How to Make a Godot Plugin
- Godot Regex - Regular Expressions
- Random Numbers
- Coroutines, Await and Yield