
Godot Event Handling
User Input results in Events being sent to each Viewport starting at the root of the SceneTree as long as the event is unhandled until it is finally ignored.
Events are sent to each Listening Node in the Scene in reverse order of the Node hierarchy. And there are four stages of Event Handling where a node may override the Event Handler Function to consume the Event and possibly set it as being handled to stop it propagating further.
Stages of Event Handling
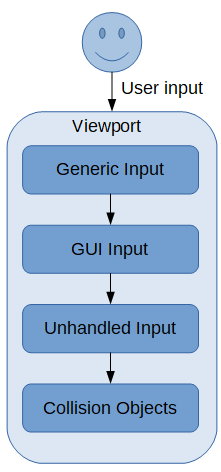
Every Node has the _input(event) method that may be overridden to consume Generic Input Events like may be done when polling as we explained in the Godot Keyboard and Mouse Button Input Programming tutorial. In that case, we were continually probing the Input status in the Game Loop and not waiting for and reacting to event triggers.
So, you can choose the best approach to take (polling vs event-driven) based on the specific point in the event-handling flow, or your understanding of where your parent Node fits into the Node-processing sequence within your scene. Either way is ok for initial testing of your prototype game.
GUI controls may use the _gui_input(event) method to react to specific GUI control actions such as clicking on buttons and entering text into a text input node that may involve typical game-playing input keys such as WASD. And in our handler code we may set the event as handled so that the following _unhandled_input(event) method does not respond to it, effectively disabling game-playing control while a popup GUI is being used.
The _unhandled_input(event) method is useful for handling game player inputs whose events have not already been set as handled.
Collision Objects have the _input_event(event) function to respond to Mouse Events over the Object seen by an Active Camera in the Viewport. For example: in a 2D or 3D game with no visible GUI or WASD style keyboard control.
Example Code
In the following code you could replace _input with any of the other event handlers such as _input_event, _unhandled_input, and _gui_input.
extends Node2D

func _input(event):
	# Detect event based on Input Map value
	if event.is_action_pressed("ui_accept"):
		print("Space bar or Enter was pressed")

	# Experiment with pressing keys
	print(event.as_text())

	# Ensure that the input event is what we are interested in
	# Different types of events contain different properties
	if event is InputEventMouseButton:
		# Check the properties of the event in the Inspector
		breakpoint;

	# Stop the event from spreading
	get_tree().set_input_as_handled()
Responding to many input events
Here is an example of code to respond to many keyboard keys:
func _unhandled_input(event):
	if event is InputEventKey:
		match event.scancode:
			KEY_LEFT:
				if event.pressed:
					start_moving_left()
				else: # key released
					stop_moving_left()
			KEY_RIGHT:
				if event.pressed:
					start_moving_right()
				else:
					stop_moving_right()
			KEY_Z:
				pass
			KEY_X:
				pass
			KEY_C:
				pass
			KEY_SPACE:
				pass
			KEY_DOWN:
				pass
			KEY_ESCAPE:
				pass
Here we are making use of various built-in constants for keyboard key scan codes.
Further Reading
The official docs have more to read about Inputs and be sure to check the API documentation for Input.
More solutions
- Godot Keyboard and Mouse Button Input Programming
- Signals in Godot
- How to Save and Load Godot Game Data
- Godot Timing Tutorial
- Using Anchor Positioning in Godot
- UI Layout using Containers in Godot
- Shaders in Godot
- Godot State Machine
- Godot Behaviour Tree
- Godot Popups
- Parsing XML Data
- Godot Parallax Background
- How to Make a Godot Plugin
- Godot Regex - Regular Expressions
- Random Numbers
- Coroutines, Await and Yield
- GraphNode and GraphEdit Tutorial